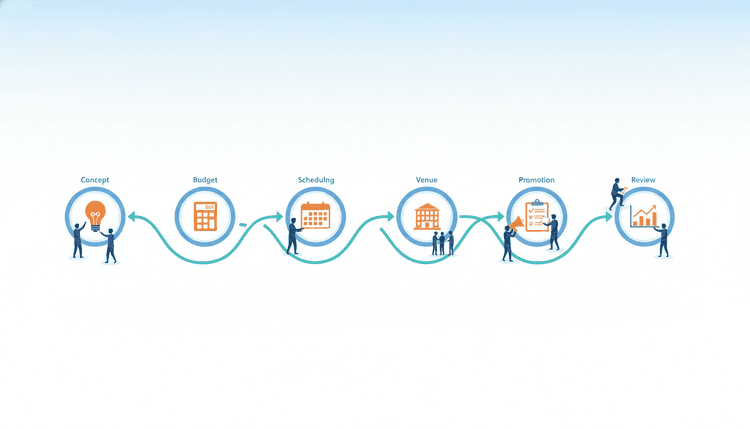
Planning an event without a clear workflow is like cooking a five-course meal without a recipe. You might get lucky, but more likely you will waste hours, overspend, and end up scrambling at the last minute. Studies show that 83% of event organizers who follow a documented process report higher attendee satisfaction and fewer day-of surprises.
This guide walks you through a proven event planning workflow, stage by stage, so you can organize any gathering with confidence.
What Is an Event Planning Workflow?
An event planning workflow is a structured sequence of tasks and decisions that moves your event from initial idea to successful execution and review. Think of it as your operational playbook. It assigns clear ownership to every step, sets deadlines, and creates checkpoints so nothing falls through the cracks.
Unlike a simple to-do list, a workflow connects each stage to the next. Completing your budget feeds into venue selection. Locking your date drives your promotion timeline. Each output becomes an input for the following stage, creating a chain of accountability that keeps the entire project on track.
Whether you are organizing a 20-person team offsite or a 500-guest conference, the same core workflow applies. The scale changes, but the structure stays the same.
Why You Need a Structured Event Planning Process
Winging it works until it does not. Here is why a structured event planning process makes a measurable difference:
- Fewer missed deadlines. When every task has an owner and a due date, bottlenecks surface early instead of the night before.
- Budget control. A workflow forces you to estimate costs before you commit, reducing overspend by up to 25% according to event industry benchmarks.
- Better collaboration. Team members know exactly what they own and when they need to deliver, eliminating the "I thought you were handling that" problem.
- Scalable repeat events. Document your workflow once and reuse it. Each iteration gets smoother because you learn from the post-event review.
- Lower stress. Knowing what comes next removes the mental load of constant improvisation.
A structured process does not make events rigid. It gives you a framework so you can focus your creative energy on the parts that matter most: the attendee experience.
The 7-Stage Event Planning Workflow
Below is a battle-tested event planning workflow broken into seven stages. Follow them in order, and adjust the depth based on your event size and complexity.
Stage 1: Concept and Goals
Every successful event starts with a clear "why." Before you book a venue or send a single invitation, answer these questions:
- What is the purpose of this event? Team building, product launch, fundraiser, celebration, or networking?
- Who is the target audience? Internal teams, customers, community members, or a mix?
- What does success look like? Define 2-3 measurable goals. Examples: 200 attendees, 90% satisfaction score, $10,000 raised.
- What is the event format? In-person, virtual, hybrid?
Write a one-page event brief that captures your answers. Share it with every stakeholder so everyone starts from the same playbook. This brief becomes your north star for every decision that follows.
Stage 2: Budgeting
Your budget is the guardrail that keeps ambition from becoming financial chaos. Start by listing every cost category:
| Category | Examples | Typical % of Budget |
|---|---|---|
| Venue | Rental, insurance, permits | 25-35% |
| Catering | Food, beverages, service staff | 20-30% |
| Technology | AV equipment, streaming, event app | 10-15% |
| Marketing | Invitations, ads, printed materials | 5-10% |
| Entertainment | Speakers, performers, activities | 10-20% |
| Contingency | Unexpected costs | 5-10% |
Always include a contingency line of 5-10%. Unexpected costs are not a risk; they are a certainty. Track your budget in a shared spreadsheet or project management tool so every team member can see the running total in real time.
Stage 3: Date Selection and Scheduling
Picking the right date can make or break attendance. Consider these factors:
- Audience availability. Avoid major holidays, school breaks, and industry conferences that compete for your attendees' time.
- Venue availability. Popular venues book months in advance, so start early.
- Lead time. Give yourself enough runway for promotion. A corporate conference typically needs 3-6 months; a team dinner needs 2-4 weeks.
- Stakeholder alignment. Key speakers, sponsors, and VIPs need to confirm before you lock the date.
When your event involves multiple stakeholders, polling for availability is far faster than endless email threads. WhenNOT lets you create a quick poll where participants mark the dates they are NOT available, so you instantly see which options work for the most people. It takes minutes instead of days.
Once you have your date, build a reverse timeline. Start from the event date and work backward, assigning deadlines for every major milestone: venue confirmation, invitation send, speaker confirmation, catering order, and rehearsal.
Stage 4: Venue and Logistics
Your venue sets the tone for the entire experience. Evaluate options against these criteria:
- Capacity. Can it comfortably hold your expected attendance plus a 10% buffer?
- Location and accessibility. Is it easy to reach by public transit? Does it have parking? Is it ADA-compliant?
- Technical requirements. Does it support your AV needs, Wi-Fi capacity, and power requirements?
- Catering options. In-house catering or can you bring external vendors?
- Cost. Does it fit within your venue budget allocation?
Once the venue is confirmed, map out the logistics:
- Room layout and seating arrangements
- Registration and check-in flow
- Signage and wayfinding
- Vendor load-in and load-out schedules
- Parking and transportation plans
Create a logistics checklist and assign each item to a specific team member with a clear deadline.
Stage 5: Promotion and Invitations
Your event is only as good as the people who show up. Build a promotion plan that reaches your target audience through the right channels:
- Email invitations. Send a save-the-date 6-8 weeks out, followed by a formal invitation 4 weeks before the event.
- Social media. Create an event page or hashtag. Post countdown content to build anticipation.
- Website or landing page. Provide all event details, agenda, speaker bios, and a clear registration link.
- Personal outreach. For high-priority attendees, a direct message or phone call goes further than a mass email.
- Partner channels. Ask sponsors, speakers, and collaborators to share the event with their networks.
Track RSVPs in real time and send reminder emails at two weeks and three days before the event. For events that require coordinating across groups, clear and timely communication keeps participation rates high.
Understanding the different types of event invitations helps you choose the right format for your audience and event style.
Stage 6: Day-of Execution
Event day is where preparation meets performance. Reduce chaos with these practices:
- Run a briefing. Gather your team 60-90 minutes before doors open. Walk through the timeline, roles, and escalation contacts.
- Designate a point person. One person should own the master timeline and make real-time decisions. Everyone else escalates to them.
- Use a minute-by-minute run sheet. List every activity, its start and end time, the responsible person, and any required equipment.
- Prepare for problems. Have backup plans for common issues: tech failures, late speakers, weather changes for outdoor events, and medical emergencies.
- Capture content. Assign someone to take photos, record sessions, and collect attendee quotes. This content fuels your post-event marketing.
Keep communication flowing with a shared messaging channel (Slack, WhatsApp, or walkie-talkies for large venues) so your team can coordinate in real time without pulling others away from their stations.
Stage 7: Post-Event Review
The event is over, but your workflow is not. The post-event review is what separates one-hit wonders from consistently great organizers.
- Send a survey within 24 hours. Ask attendees to rate their experience, highlight what worked, and flag what did not.
- Debrief with your team. Schedule a 30-minute retrospective within a week. Cover: What went well? What surprised us? What should we change next time?
- Reconcile the budget. Compare actual spending to your estimates. Identify where you saved and where you overspent.
- Archive your materials. Save your event brief, run sheet, vendor contacts, and survey results in a shared folder. Future you will thank present you.
- Report on goals. Go back to the goals you set in Stage 1. Did you hit them? If not, why? Use data, not gut feelings.
This review becomes the first input for your next event's concept stage, closing the loop and making every event better than the last.
Event Planning Workflow Comparison Table
How does a structured workflow compare to winging it? Here is a side-by-side look:
| Aspect | Manual / Ad-Hoc Planning | Workflow-Driven Planning |
|---|---|---|
| Timeline visibility | Scattered across emails and notes | Centralized with clear milestones |
| Budget tracking | Retroactive, often after overspending | Real-time with category breakdowns |
| Date selection | Endless back-and-forth emails | Quick polls with tools like WhenNOT |
| Task ownership | Ambiguous, "someone will handle it" | Every task has a named owner |
| Stakeholder alignment | Frequent miscommunication | Shared brief keeps everyone aligned |
| Day-of coordination | Reactive firefighting | Proactive run-sheet execution |
| Post-event learning | Anecdotal, easily forgotten | Documented and actionable |
| Scalability | Reinventing the wheel each time | Repeatable template improves over time |
Tools That Simplify Your Event Planning Workflow
The right tools turn your workflow from a document into a living system. Here are the categories that matter most:
- Scheduling and availability. Polling tools eliminate the back-and-forth of finding a date that works for everyone. WhenNOT takes a unique approach by asking participants to mark when they are NOT available, making it fast to find the best option. Explore different types of scheduling tools to find the right fit for your process.
- Project management. Platforms like Trello, Asana, or Notion help you assign tasks, set deadlines, and track progress across stages.
- Communication. A dedicated event channel in Slack or Microsoft Teams keeps conversations organized and searchable.
- Budgeting. Shared spreadsheets or dedicated event budget tools give your team real-time spending visibility.
- Registration and ticketing. Tools that handle sign-ups, payments, and attendee data in one place reduce manual work.
- Survey and feedback. Post-event survey tools help you collect structured feedback quickly.
You do not need every tool on this list. Start with scheduling and project management, then add tools as your events grow in complexity.
Ready to schedule your next group event without the headache? Find the perfect dates in minutes with WhenNOT.
Event Planning Workflow Template
Use this checklist as a starting point for your next event. Customize it based on your event type and scale.
Stage 1: Concept and Goals (8-12 weeks before)
- Define event purpose and objectives
- Identify target audience
- Set 2-3 measurable success metrics
- Write and distribute event brief
Stage 2: Budgeting (8-10 weeks before)
- Create budget with all cost categories
- Add 5-10% contingency line
- Get stakeholder approval on budget
- Set up shared budget tracking
Stage 3: Date Selection (6-8 weeks before)
- Poll key stakeholders for availability
- Check for conflicting events and holidays
- Confirm date with venue and speakers
- Build reverse timeline with milestones
Stage 4: Venue and Logistics (5-7 weeks before)
- Visit and confirm venue
- Book catering and AV vendors
- Plan room layout and registration flow
- Create logistics checklist with owners
Stage 5: Promotion (4-6 weeks before)
- Send save-the-date communications
- Launch event page or landing page
- Activate social media promotion
- Send formal invitations
- Track RSVPs and send reminders
Stage 6: Day-of Execution
- Hold team briefing 60-90 minutes before
- Distribute minute-by-minute run sheet
- Assign point person for real-time decisions
- Capture photos, recordings, and quotes
Stage 7: Post-Event Review (within 1 week)
- Send attendee survey within 24 hours
- Hold team retrospective
- Reconcile budget vs. actuals
- Archive all event materials
- Report on goals from Stage 1
FAQ
What is an event planning workflow?
An event planning workflow is a structured, repeatable sequence of stages that guides you from the initial event concept through execution and post-event review. It assigns clear task ownership, sets deadlines, and connects each stage so that the output of one step feeds directly into the next.
How many stages should an event planning workflow have?
Most event planning workflows work well with 5-7 stages. The seven-stage model (concept, budgeting, date selection, venue, promotion, execution, review) covers the full event lifecycle. You can collapse or expand stages depending on your event size and complexity.
How do I choose the best date for my event?
Start by identifying dates that conflict with holidays, competing events, or key stakeholder schedules. Then poll your attendees and team members for availability. Tools like WhenNOT simplify this by letting participants mark dates they are NOT free, giving you a clear picture of the best options in minutes.
What is the biggest mistake in event planning?
Skipping the post-event review is the most common and costly mistake. Without structured feedback and data analysis, you repeat the same errors and miss opportunities to improve. Always close the loop by surveying attendees, debriefing with your team, and reconciling your budget.
How far in advance should I start planning an event?
Timelines vary by event type. Large conferences and galas need 6-12 months of lead time. Corporate team events and mid-size gatherings work well with 2-3 months. Small team dinners or social events can come together in 2-4 weeks with a solid workflow in place.
Can I reuse an event planning workflow for different types of events?
Yes. The core seven-stage workflow applies to events of all types and sizes, from intimate team offsites to large public conferences. Adjust the depth and timeline of each stage to match your event, but keep the overall structure consistent for reliable results.
What tools do I need for event planning?
At minimum, you need a scheduling tool for date coordination and a project management tool for task tracking. As your events grow, add dedicated tools for budgeting, registration, communication, and feedback collection. Start simple and scale your toolkit with your event complexity.