
Most American teams say scheduling group meetings is their biggest challenge, with some surveys showing over 60 percent experiencing conflicts that waste valuable time. When every participant has a different work schedule and personal commitments, finding a shared time slot feels nearly impossible. Learning a systematic approach to collecting and analyzing availability can help any group choose meeting dates that actually work for everyone, reducing frustration and making meetings far more productive.
Table of Contents
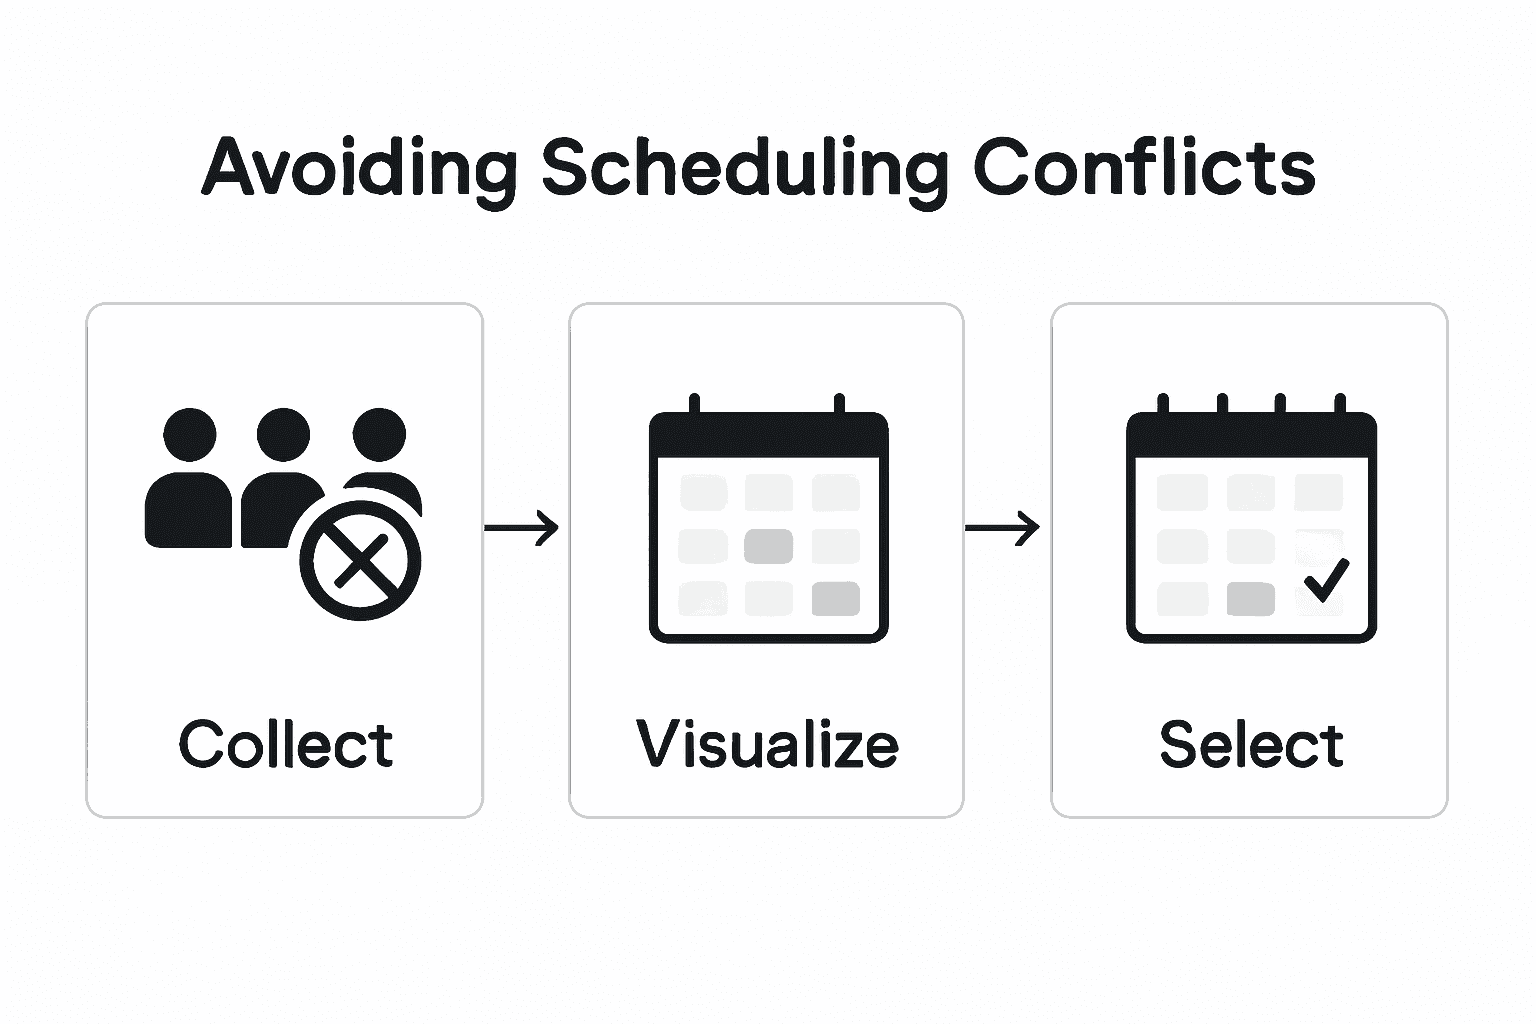
- Step 1: Identify Participant Availability Constraints Up Front
- Step 2: Collect Unavailable Dates Using Whennot Tool
- Step 3: Visualize And Analyze Group Busy Periods Instantly
- Step 4: Select Optimal Dates To Minimize Schedule Overlap
- Step 5: Confirm Final Details With All Participants
Quick Summary
| Key Point | Explanation |
|---|---|
| 1. Identify availability early | Collect specific unavailable times from participants to avoid scheduling conflicts later on. |
| 2. Use the WhenNOT tool | This tool simplifies collecting participant unavailability, reducing manual tracking and enhancing efficiency. |
| 3. Visualize data effectively | Use visual representations of availability to quickly identify optimal meeting windows and scheduling conflicts. |
| 4. Analyze for optimal times | Focus on selecting dates with the least conflicts and the highest participant flexibility for effective meetings. |
| 5. Confirm details clearly | Send clear meeting details and a simple response mechanism to ensure all participants can confirm their attendance efficiently. |
Step 1: Identify participant availability constraints up front
Successfully avoiding scheduling conflicts starts with understanding participant availability before setting any meeting times. This crucial first step requires proactively mapping out when people cannot meet.
To effectively identify participant constraints, begin by creating a comprehensive availability survey. Research indicates scheduling technologies like Optimeet can help researchers systematically track participant schedules by allowing detailed data uploads and schedule optimization. Start by reaching out to all potential participants and request their specific unavailable time windows. This means collecting information about work commitments, personal obligations, travel plans, and recurring scheduling restrictions.

Gather availability details through multiple channels digital and personal. Send out a standardized template requesting participants mark their unavailable dates and times. Pay special attention to any recurring patterns like standing meetings, class schedules, or routine commitments that might consistently block potential event windows. Consider using digital scheduling tools that allow participants to input constraints without extensive manual communication.
Pro tip: Create a simple spreadsheet or use an online collaborative tool where participants can quickly and anonymously mark their unavailable time slots, making the constraint identification process both efficient and user friendly.
Step 2: Collect unavailable dates using WhenNOT tool
Streamlining group scheduling requires an efficient method of collecting participant unavailability without complex manual tracking. The WhenNOT tool provides a straightforward solution for gathering scheduling constraints quickly and anonymously.
To begin, create your event in the WhenNOT platform by selecting a potential date range that accommodates your group's general timeline. Explore comprehensive group scheduling strategies through the expert scheduling tool comparison to understand how different platforms handle availability tracking. Invite participants by sharing a unique link that allows them to mark their unavailable dates without requiring account creation. This approach eliminates the typical back-and-forth email communication and simplifies the entire scheduling process.
The platform's unique inverse scheduling method means participants only need to indicate when they cannot meet, which automatically highlights potential meeting windows. This dramatically reduces the complexity of coordinating multiple schedules. Focus on sending clear instructions with the WhenNOT link and encourage participants to mark all known conflicts quickly and comprehensively.
Pro tip: Set a clear deadline for participants to input their unavailable dates to ensure timely and complete scheduling information.
Here's a quick comparison of group scheduling tools and their unique features:
| Tool Name | Scheduling Approach | Key Advantage |
|---|---|---|
| Optimeet | Direct availability input | Systematic tracking and optimization |
| WhenNOT | Inverse unavailability | Fast, anonymous data collection |
| Doodle | Poll-based availability | Simple participant surveys |
| Calendly | Automated slot selection | Instant booking with calendar integration |
Step 3: Visualize and analyze group busy periods instantly
Transforming raw availability data into actionable insights requires powerful visual analysis that helps you quickly identify optimal meeting windows. Advanced visualization techniques like Availability Bars can help track participant preferences across time periods with remarkable precision.
Once participants have submitted their unavailable dates, the WhenNOT tool automatically generates a comprehensive visual representation of group availability. This intuitive interface displays busy periods using color coded gradients that instantly reveal potential scheduling conflicts. The platform highlights overlapping unavailable times across all participants, allowing you to instantly recognize the most challenging scheduling windows and potential collaboration opportunities.
Carefully examine the generated visualization to identify patterns and potential meeting slots. Look for consistent green or open time periods that represent high group availability. Pay special attention to areas where multiple participants show flexibility, as these represent your most promising scheduling opportunities. The visual interface eliminates complex manual calculations and provides an immediate snapshot of your group's collective schedule.
Pro tip: Screenshot the visualization and share it with participants to get quick consensus on the most suitable meeting times.
Step 4: Select optimal dates to minimize schedule overlap
Picking the perfect meeting time requires strategic analysis beyond simple availability. Advanced combinatorial optimization techniques can help generate schedules that maximize participant attendance while minimizing potential conflicts.
Carefully review the visualization of group availability and focus on time windows that demonstrate the highest collective flexibility. Look for periods where multiple participants show consistent openness. Prioritize dates that have the least number of overlapping unavailable times. This approach ensures you are selecting windows that accommodate the maximum number of participants while respecting individual scheduling constraints.
Consider additional contextual factors beyond pure availability. Assess potential meeting times by considering participants travel schedules work commitments and personal preferences. Some time slots might technically be open but less convenient for group dynamics. The goal is not just finding an available time but selecting a window that promotes engagement and minimizes scheduling friction.
Pro tip: Always include a brief buffer time between identifying potential dates and finalizing the schedule to allow participants a chance to confirm or adjust their availability.
Step 5: Confirm final details with all participants
Finalizing group scheduling requires clear communication and precise confirmation from every participant. Online scheduling platforms can help streamline the final confirmation process through automated notifications and real time updates ensuring everyone remains informed.
Reach out to all participants with a comprehensive summary of the proposed meeting time and specific details. Include the exact date location and expected duration of the event. Request explicit confirmation from each participant and provide them a simple mechanism to respond quickly. Some participants might need to make minor adjustments or have additional constraints that were not initially apparent during the initial availability collection phase.
Encourage participants to respond promptly and clearly indicate their ability to attend. If someone cannot confirm immediately ask them to provide a timeframe for their response or suggest alternative options. Be prepared to make minor adjustments if critical team members cannot fully commit to the proposed time. Maintain flexibility while also setting reasonable expectations about the scheduling process.
This summary highlights critical factors to review when confirming group meeting details:
| Confirmation Factor | Why It Matters | Best Practice |
|---|---|---|
| Date and Time Clarity | Prevents miscommunication | Send exact details to all participants |
| Rapid Response Mechanism | Shortens finalization timeline | Use simple digital reply options |
| Adjustment Flexibility | Accommodates last-minute changes | Allow minor updates pre-finalization |
| Attendance Commitment | Ensures full engagement | Request explicit confirmations |
Pro tip: Create a standard confirmation template with clear yes no and maybe options to make participant response tracking straightforward and efficient.
Simplify Scheduling and Avoid Conflicts with WhenNOT
Scheduling group events can feel overwhelming when trying to collect everyone's availability and analyze all the busy periods. This article highlights how identifying unavailable dates upfront and visualizing group constraints are key to avoiding scheduling conflicts and maximizing participant attendance. If you have ever experienced frustration coordinating multi-day or flexible date events you are not alone. The challenge is knowing exactly when people are busy rather than just guessing availability.
WhenNOT offers a unique solution by asking participants only when they are not available. This inverse scheduling method streamlines the process by reducing the endless back-and-forth communication and offering instant visualization of overlapping busy days. WhenNOT makes it easy to collect unavailable dates anonymously without requiring account creation. You can create an event, share a simple link with your group, and see optimal meeting times without spending hours on scheduling headaches.
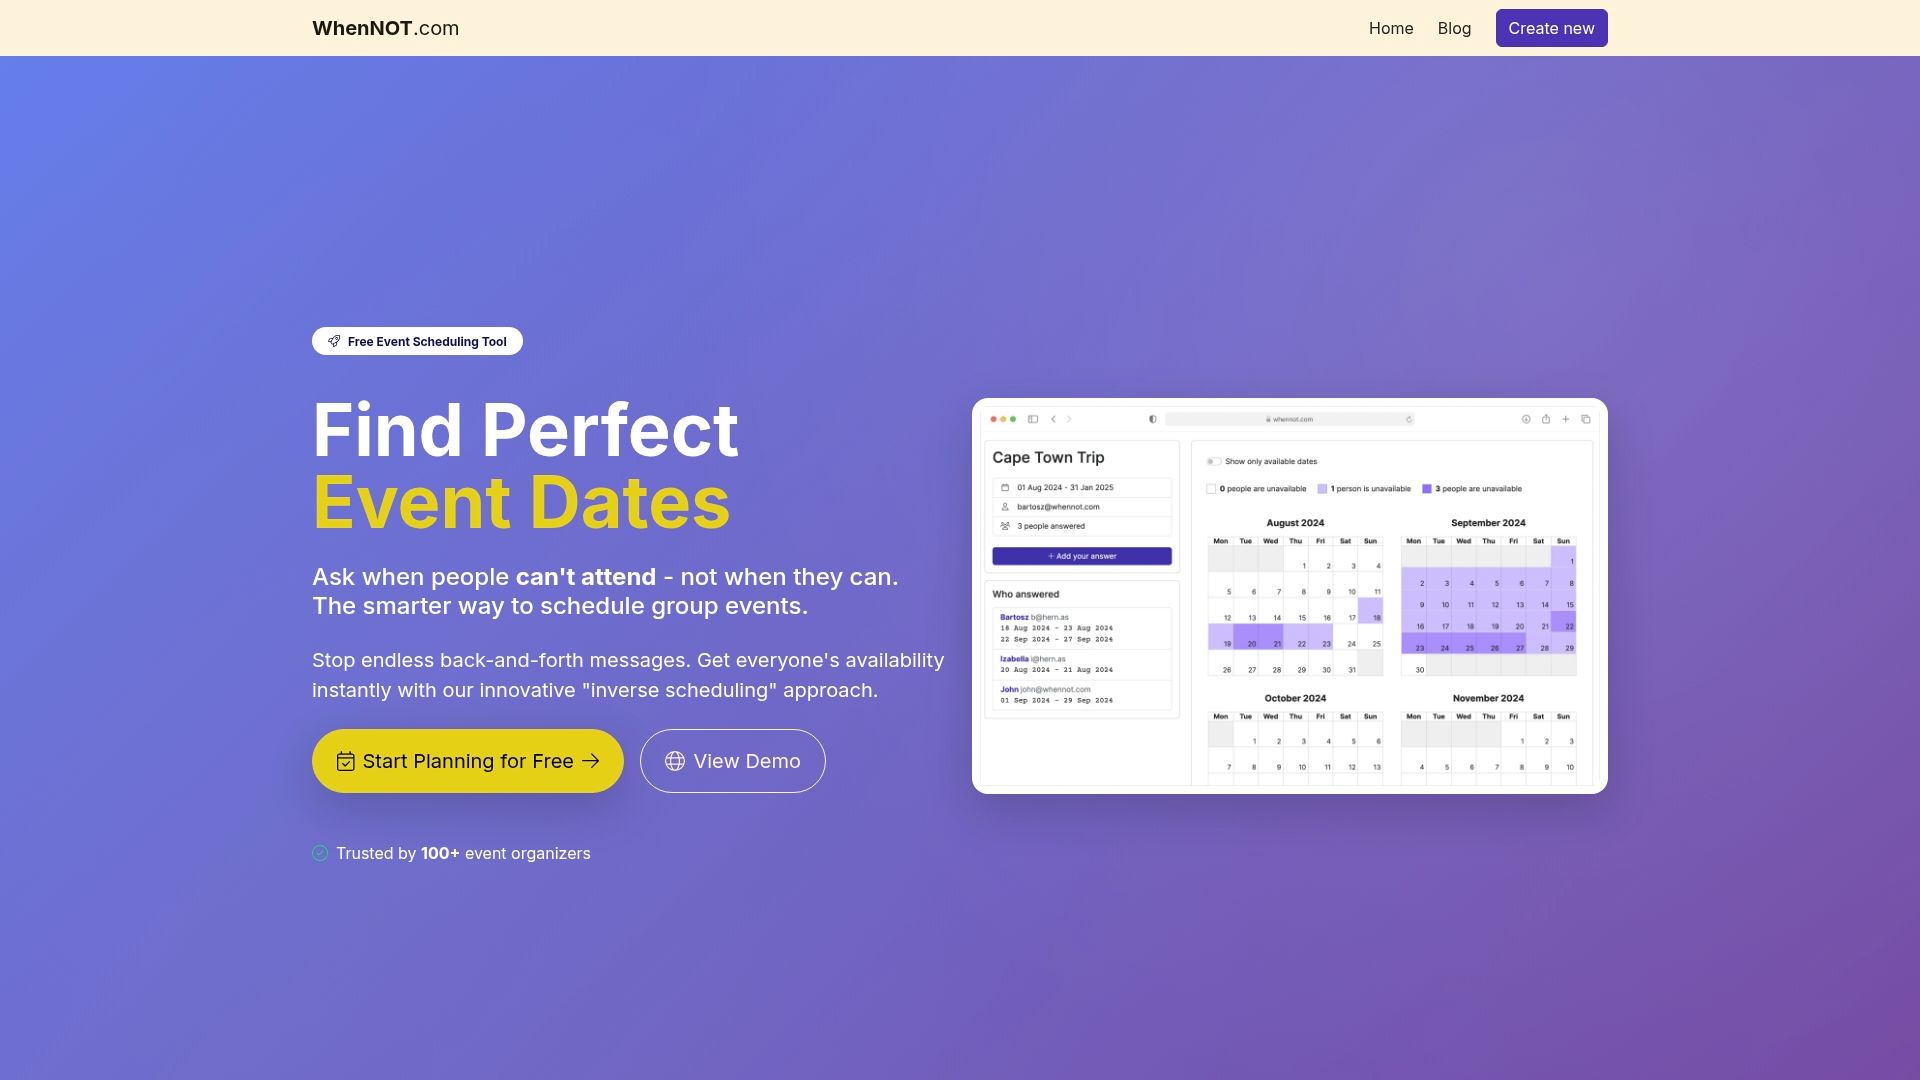
Ready to stop wrestling with complicated calendars and start scheduling smarter today Use WhenNOT to save valuable time and reduce stress. Discover how this innovative tool can help you avoid conflicts, maximize attendance, and confirm final details with clear, effortless communication. Visit WhenNOT landing page to create your free event now and experience the power of inverse scheduling for group planning. Don’t wait until scheduling conflicts delay your next important event. Act now and see how easy group coordination can really be.
Frequently Asked Questions
How can I identify participant availability constraints before scheduling?
To identify participant availability constraints, create a comprehensive survey to collect details on when participants cannot meet. Request them to mark their unavailable dates and times, taking into account work commitments, personal obligations, and recurring scheduling conflicts.
What is the best way to collect unavailable dates from participants?
Using a tool like WhenNOT simplifies the process of collecting unavailable dates by allowing participants to indicate conflicts anonymously. Create your event within the platform and share a unique link so participants can quickly mark their unavailability without needing to communicate through email.
How do I visualize participant availability to find the best meeting times?
You can visualize participant availability by utilizing tools that generate color-coded representations of group schedules based on submitted unavailability data. Analyze these visualizations to spot periods of high collective availability, helping you identify optimal meeting times quickly.
What factors should I consider when selecting a meeting time?
In addition to participant availability, consider factors such as travel schedules and overall participant preferences to ensure chosen meeting times promote engagement. Focus on selecting time slots with the least overlap of unavailability for maximum attendance.
How do I confirm the final details of a scheduled meeting?
Reach out to all participants with clear details about the proposed meeting date, time, and location, requesting explicit confirmations from each individual. Provide a simple response mechanism, like a quick reply option, to facilitate prompt feedback and accommodate any last-minute changes effectively.