
Every large-scale corporate retreat starts with one critical hurdle scheduling. With teams spread across multiple departments and locations, finding a common date quickly becomes a tangle of messages and miscommunication. For North American event coordinators, clarity on event objectives and requirements transforms chaotic coordination into a directed process that saves time and reduces stress. This guide outlines practical steps to align teams, maximize attendance, and secure the right dates without endless back-and-forth.
Table of Contents
- Step 1: Define Event Objectives And Requirements
- Step 2: Leverage Inverse Scheduling For Availability
- Step 3: Share Scheduling Links And Collect Responses
- Step 4: Identify Optimal Dates And Finalize Booking
- Step 5: Verify Participant Details And Confirm Arrangements
Quick Summary
| Key Insight | Explanation |
|---|---|
| 1. Define Clear Event Objectives | Establish specific goals to guide planning decisions, ensuring alignment across stakeholders. |
| 2. Use Inverse Scheduling | Ask participants when they're unavailable to simplify and expedite the scheduling process. |
| 3. Share Scheduling Links Promptly | Distribute your scheduling link right after event announcements to maximize engagement and input. |
| 4. Analyze Response Data for Dates | Focus on dates with the least unavailable responses to maximize attendance and streamline logistics. |
| 5. Verify Participation Details Early | Confirm attendee details to prevent last-minute surprises and ensure smooth event execution. |
Step 1: Define event objectives and requirements
Before you send invitations or book a venue, you need clarity on what you're actually trying to accomplish. Event objectives shape every decision you'll make, from guest count to timeline to budget allocation. Without them, you're essentially planning blindfolded.
Start by identifying your core purpose. Are you hosting a three-day team retreat to strengthen cross-departmental relationships? A planning session to brainstorm strategy for Q2? A celebration to recognize top performers? Each has a completely different energy and focus.
Once you've nailed your primary objective, define what success looks like. This isn't vague aspirational thinking. Get specific.
- Achieve 85% attendance across all three days
- Generate 15 actionable ideas from breakout sessions
- Increase team engagement scores by 20% post-event
- Build trust between departments that rarely interact
- Deliver a measurable ROI on the retreat investment
Next, document your event requirements. These are the practical necessities that support your objectives. Understanding event management fundamentals means recognizing that every aspect from budgeting to site selection to catering logistics must align with what you're trying to achieve.
List these requirements clearly:
- Duration and dates needed
- Expected attendee count and breakdown by department
- Budget ceiling
- Must-have activities or sessions
- Dietary restrictions and accessibility needs
- Technology or equipment requirements
- Geographic preferences or constraints
Clarity on objectives and requirements eliminates guesswork later and keeps stakeholders aligned throughout planning.
One final step: identify decision-makers and stakeholders. Who needs to approve the date? Who will fund this? Who's actually attending? Getting buy-in early prevents costly surprises and ensures everyone's working toward the same goals.
Pro tip: Write your objectives in a shared document that every stakeholder signs off on before you move to scheduling—it's your North Star and prevents scope creep that derails timelines and budgets.
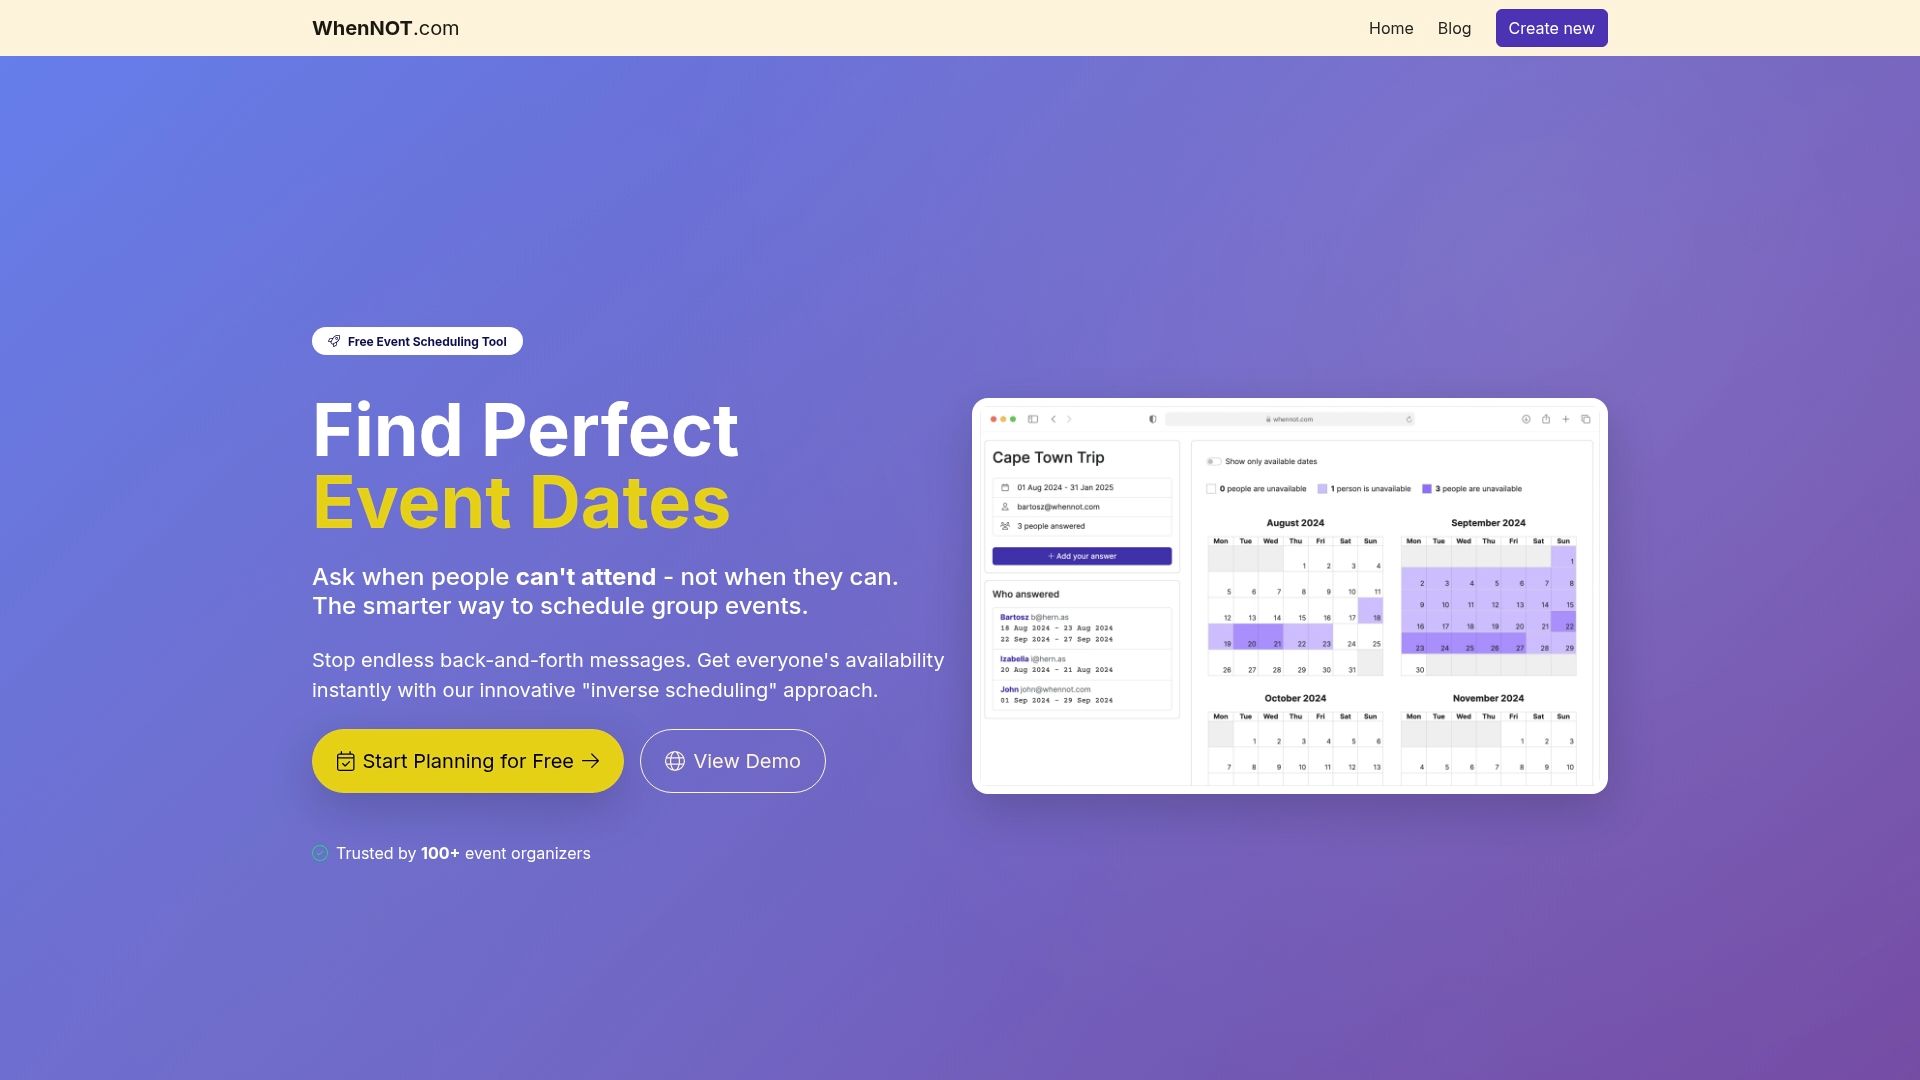
Step 2: Leverage inverse scheduling for availability
Traditional scheduling asks people when they're free. Inverse scheduling flips this on its head by asking when they're busy. For corporate retreat planning, this approach saves hours of back-and-forth emails and reduces decision fatigue across your team.

Here's why this matters for your multi-day event. Instead of sending availability polls where participants juggle multiple calendars and time zones, you simply ask them to mark their unavailable dates. This is faster, more accurate, and requires zero signup friction from attendees.
The process is straightforward. You set a potential date range for your event, then share a scheduling link with participants. Crowd-sourced scheduling approaches work best when participants provide input asynchronously, eliminating the pressure of real-time responses.
Participants mark their blocked-out days without needing accounts or logins. They simply indicate which dates don't work for them. The system then visualizes everyone's busy days concurrently, making optimal dates immediately obvious.
This method eliminates common scheduling headaches:
- No scattered responses across email, Slack, and text messages
- Immediate visual clarity on which dates work for most people
- Reduced back-and-forth communication with reluctant respondents
- Clear identification of your best date options within minutes, not days
- Accommodation for time zone differences without complex conversions
For retreats spanning multiple days, inverse scheduling reveals which date ranges allow the highest attendance. You'll see at a glance whether your preferred dates work or if shifting by a day or two dramatically improves participation.
Inverse scheduling turns availability management from a time-consuming coordination task into a five-minute decision.
Once participants submit their unavailable dates, you gain instant insight into optimal timing. No spreadsheet parsing required. No guessing who hasn't responded yet. The data is right there, visual and actionable.
This approach also respects everyone's time. People spend maybe two minutes marking their blocked dates instead of comparing their calendar against multiple competing options.
Pro tip: Share your scheduling link at the same time you communicate event objectives and confirm attendee list—this lets people add blocking to their calendars immediately while your retreat details are fresh in their minds.
Step 3: Share scheduling links and collect responses
You've defined your objectives and set your date range. Now it's time to get input from everyone who'll attend. This step is where coordination either becomes frictionless or descends into chaos.
Create your scheduling link through your chosen platform. The link should include your event name, the date range you're considering, and clear instructions on what participants need to do. That's it. No registration walls, no account requirements.
When you share the link, timing matters. Send it when you have your team's full attention, ideally right after announcing the retreat itself. Include context about why you need their input and when you'll make the final decision.
Participants access the link and mark their unavailable dates. Scheduling polls with visual heatmaps automatically aggregate responses, so you don't manually track who responded or calculate availability percentages.
Here's what makes this approach powerful for large corporate groups:
- No email threads spiraling out of control
- Responses arrive in real time as people click the link
- Visual display shows instantly which dates work best
- Works seamlessly across devices and time zones
- Takes participants under two minutes to complete
Set a response deadline and communicate it clearly. Two to three days is typically sufficient for internal teams. This creates urgency without feeling rushed.
As responses come in, you'll see patterns emerge immediately. One date might show minimal conflicts while others light up with unavailable participants. This visual clarity makes your final decision obvious.
Real-time response aggregation eliminates the guesswork and lets you finalize dates within days instead of weeks.
Don't wait for 100% participation before analyzing. Once you hit 70 to 80% of responses, clear patterns usually emerge. Follow up directly with non-responders only if their attendance is critical for the event's success.
Once you've collected sufficient responses and identified your optimal dates, you're ready to lock in decisions and move forward with logistics.
Pro tip: Send a reminder notification 24 hours before your deadline to everyone who hasn't responded yet—this final push typically captures the stragglers without requiring individual follow-up emails.
Step 4: Identify optimal dates and finalize booking
You've collected responses and visualized everyone's availability. Now comes the decision that unlocks everything else. Picking the right date determines whether your retreat happens or becomes another postponed initiative.
Analyze your response data with fresh eyes. Look for dates where the fewest people marked unavailable days. These are your green-light options. If two dates show similar conflict levels, choose the one that accommodates your highest-priority attendees.
Choosing the right event date requires balancing attendance maximization against venue constraints and budget implications. Consider whether your preferred dates align with seasonal demand, avoid local holidays, and sidestep competing company events.
Now factor in logistics. Does your ideal date give you enough time to book the venue, arrange catering, and handle logistics? If you're planning a three-day retreat, you typically need six to eight weeks of lead time for North American venues.
Here's a quick summary of factors influencing optimal event dates:
| Factor | Impact on Scheduling | Why It Matters |
|---|---|---|
| Attendance Levels | Higher participation rates | Maximizes team engagement |
| Venue Availability | Flexible or limited options | Secures preferred location |
| Budget Constraints | Low or high-season pricing | Controls overall event expenses |
| Competing Events | Potential date conflicts | Avoids reduced attendance |
| Lead Time | Preparation period required | Ensures smooth logistics |
Create a shortlist of your top three date options. Run these past key stakeholders—finance, facilities, and any external vendors. Sometimes a slightly less popular date unlocks better venue pricing or availability.
Once stakeholders align, make your decision public immediately. Announce the confirmed dates clearly and commit to them. Here's what should happen next:
- Lock in your venue booking with a signed contract
- Reserve catering services and confirm headcount deadlines
- Block calendar time for all confirmed attendees
- Begin detailed planning for activities and logistics
- Communicate final details to all participants
Don't second-guess after you've decided. Effective event planning timelines require coordinating multiple moving pieces, and delays create cascading problems across vendors and teams.
Committing to dates empowers your entire planning team to move forward instead of lingering in decision mode.
Some coordinators worry about the small percentage who marked those dates as unavailable. Expect some attrition. If your analysis showed 78% availability on your chosen date, that's strong enough to proceed with confidence.
Pro tip: Send confirmation within 24 hours of finalizing dates—include venue address, check-in times, and parking details so attendees immediately block their calendars and arrange travel.
Step 5: Verify participant details and confirm arrangements
Dates are locked. Venue is booked. Now you need absolute clarity on who's actually attending and what they need. This step prevents last-minute surprises that derail logistics.
Pull together your final attendee list from all sources. Cross-reference scheduling responses with your company directory to catch duplicate entries or outdated contact information. Verify email addresses are current and phone numbers are accurate.
Reach out to each confirmed attendee with a clear message. Include the retreat dates, venue address, check-in time, parking instructions, and any pre-event requirements. Ask them to confirm receipt and flag any special needs.
This is your opportunity to collect critical information before the event. Verifying participant authenticity ensures data integrity and confirms genuine attendance commitments. Request confirmations through a simple form or direct email reply.
Create a master spreadsheet tracking each person's status:
- Name and department
- Confirmed attendance (yes, no, maybe)
- Dietary restrictions
- Accessibility needs
- Emergency contact information
- Special requests or concerns
Follow up with anyone who doesn't confirm within your deadline. Sometimes people assume they're automatically included without actively confirming. A gentle reminder often surfaces late registrations.
Now communicate event specifics to your team. Keeping participants informed about arrangements builds trust and engagement. Send a detailed pre-event email covering agenda overview, timing, what to bring, and any preparation they should complete.
Address common questions upfront:
- Will meals and transportation be provided?
- What should I bring or wear?
- Can I bring a plus-one?
- What's the weather forecast for outdoor activities?
- Who do I contact if I need to cancel?
Transparent communication eliminates day-of confusion and keeps attendees mentally prepared for the experience.
Verify your vendor confirmations too. Confirm catering headcount, room setup requirements, and any A/V needs. Get written confirmation from each vendor that they've received your specifications.
Use this reference chart to verify critical attendee and vendor details before your event:
| Verification Area | Description | Outcome |
|---|---|---|
| Attendee Info | Confirm name, department, contact | Accurate participation list |
| Dietary Needs | Gather food restrictions | Proper meal planning |
| Accessibility Needs | Identify physical or tech concerns | Inclusive environment |
| Vendor Confirmation | Get written service guarantees | No last-minute surprises |
About two weeks before your event, send a reminder to all confirmed participants with the essentials. This second touch keeps your retreat top-of-mind and catches any last-minute cancellations before they impact your final numbers.
Pro tip: Create a simple online form using a tool like Google Forms to collect confirmations and special requests—it's faster than email chains and gives you organized data you can sort and filter instantly.
Simplify Your Social Event Planning and Achieve Seamless Coordination
Planning efficient social events requires clear objectives, swift date decisions, and smooth communication. This article highlights challenges like scheduling multi-day retreats and collecting participant availability without endless back-and-forth emails. Key pain points include managing busy calendars, reducing decision fatigue, and ensuring high attendance through transparent, real-time availability insights using concepts such as inverse scheduling.
WhenNOT’s innovative inverse scheduling platform directly addresses these obstacles by asking invitees when they are busy instead of available. This method streamlines group coordination by visualizing everyone's unavailable dates concurrently. It eliminates lengthy email threads, respects participants’ time, and quickly reveals optimal options for your social events, retreats, or group gatherings. For anyone looking to avoid confusion and accelerate decisions, WhenNOT offers a free and easy solution tailored to your event planning needs.
Ready to experience effortless group scheduling and never miss your ideal date again
 Explore the power of inverse scheduling with WhenNOT and transform your event planning process today. Start creating your event, share a simple link for quick responses, and finalize your dates with confidence. Don’t let scheduling headaches delay your next social event. Visit WhenNOT now and bring seamless coordination to your group planning.
Frequently Asked Questions
What are the key steps for planning efficient social events for group coordination?
Start by defining your event objectives and requirements to ensure all decisions align with your goals. Next, utilize inverse scheduling to find optimal dates by identifying when participants are unavailable, which streamlines the scheduling process.
How can I verify participant details effectively for my social event?
Collect a final attendee list by cross-referencing scheduling responses and verifying current contact information. Reach out to confirmed attendees to ask for their dietary restrictions, accessibility needs, and any other special requests to ensure everyone's requirements are met.
What should I include in the communication with participants before the event?
Send a detailed email covering the retreat agenda, check-in times, venue address, parking instructions, and any items participants should bring. This proactive communication helps prevent confusion and prepares attendees for a positive experience.
How can I analyze availability responses to choose the best date for my social event?
Look for dates with the fewest marked unavailable days in your response data to identify optimal scheduling options. Aim to finalize your date selection within a few days of collecting responses to keep planning on schedule.
What factors should I consider when finalizing the venue for my social event?
Evaluate venue availability, budget constraints, and competing events that might conflict with your chosen date. Aim to book the venue at least six to eight weeks in advance to ensure you have all logistics covered before the event.