
Did you know that over 70 percent of group events are delayed or rescheduled due to planning conflicts? Organizing a gathering can quickly become stressful when busy schedules collide. When every participant’s availability matters, finding the right date feels like solving a puzzle with missing pieces. Discover a proven approach that simplifies group scheduling so you can coordinate your next event with less hassle and higher participation.
Table of Contents
- Step 1: Define Your Event Details And Date Range
- Step 2: Create A Group Availability Poll With Whennot
- Step 3: Invite Participants To Mark Unavailable Dates
- Step 4: Analyze Visualized Busy Days For Overlaps
- Step 5: Select And Confirm The Optimal Event Date
Quick Summary
| Key Point | Explanation |
|---|---|
| 1. Define Event Purpose Clearly | Identify the core purpose to guide logistics and participant engagement effectively. |
| 2. Utilize WhenNOT for Scheduling | This tool simplifies scheduling by collecting participants' unavailable dates instead of their available times. |
| 3. Encourage Fast Participation | Request responses within 48 hours to maintain planning momentum and engage participants efficiently. |
| 4. Analyze Visual Availability Patterns | Use visual data to identify the best date options based on overlapping participant availability quickly. |
| 5. Confirm Date Promptly | Select and communicate the chosen date quickly to solidify plans and ensure maximum attendance. |
Step 1: Define your event details and date range
Successful event planning starts with crystal clear details. In this crucial first step, you will outline the fundamental elements that will guide your entire event coordination process.
Begin by articulating your event's core purpose. Are you organizing a family reunion, planning a corporate team retreat, coordinating a group vacation, or scheduling a community meetup? Understanding the specific goal helps you make targeted decisions about timing, participants, and logistics.
Next, pinpoint your target audience and expected number of participants. According to NYC event planning resources, determining your attendees helps you select a date and time that maximizes potential participation. Consider factors like work schedules, school calendars, and potential conflicts with other major events.
Create a brief but comprehensive event description that captures the essence of your gathering. As recommended by GSA Network planning guidelines, a well defined description keeps your planning focused and provides clarity for all participants. Include key details such as the event type, primary objectives, and any special requirements or expectations.
Pro Tip: Always build some flexibility into your initial planning. Unexpected scheduling challenges can arise, so having a backup date range can save significant stress.
Once you have your foundational details, start exploring potential date ranges. Look for windows that offer the best overlap in participant availability. Consider multi day options if your event doesnt require a single fixed date.
By thoroughly defining your event details and potential date range upfront, youll set the stage for smoother coordination and higher participant engagement. Ready to move forward? The next step will help you gather participant availability with unprecedented ease.
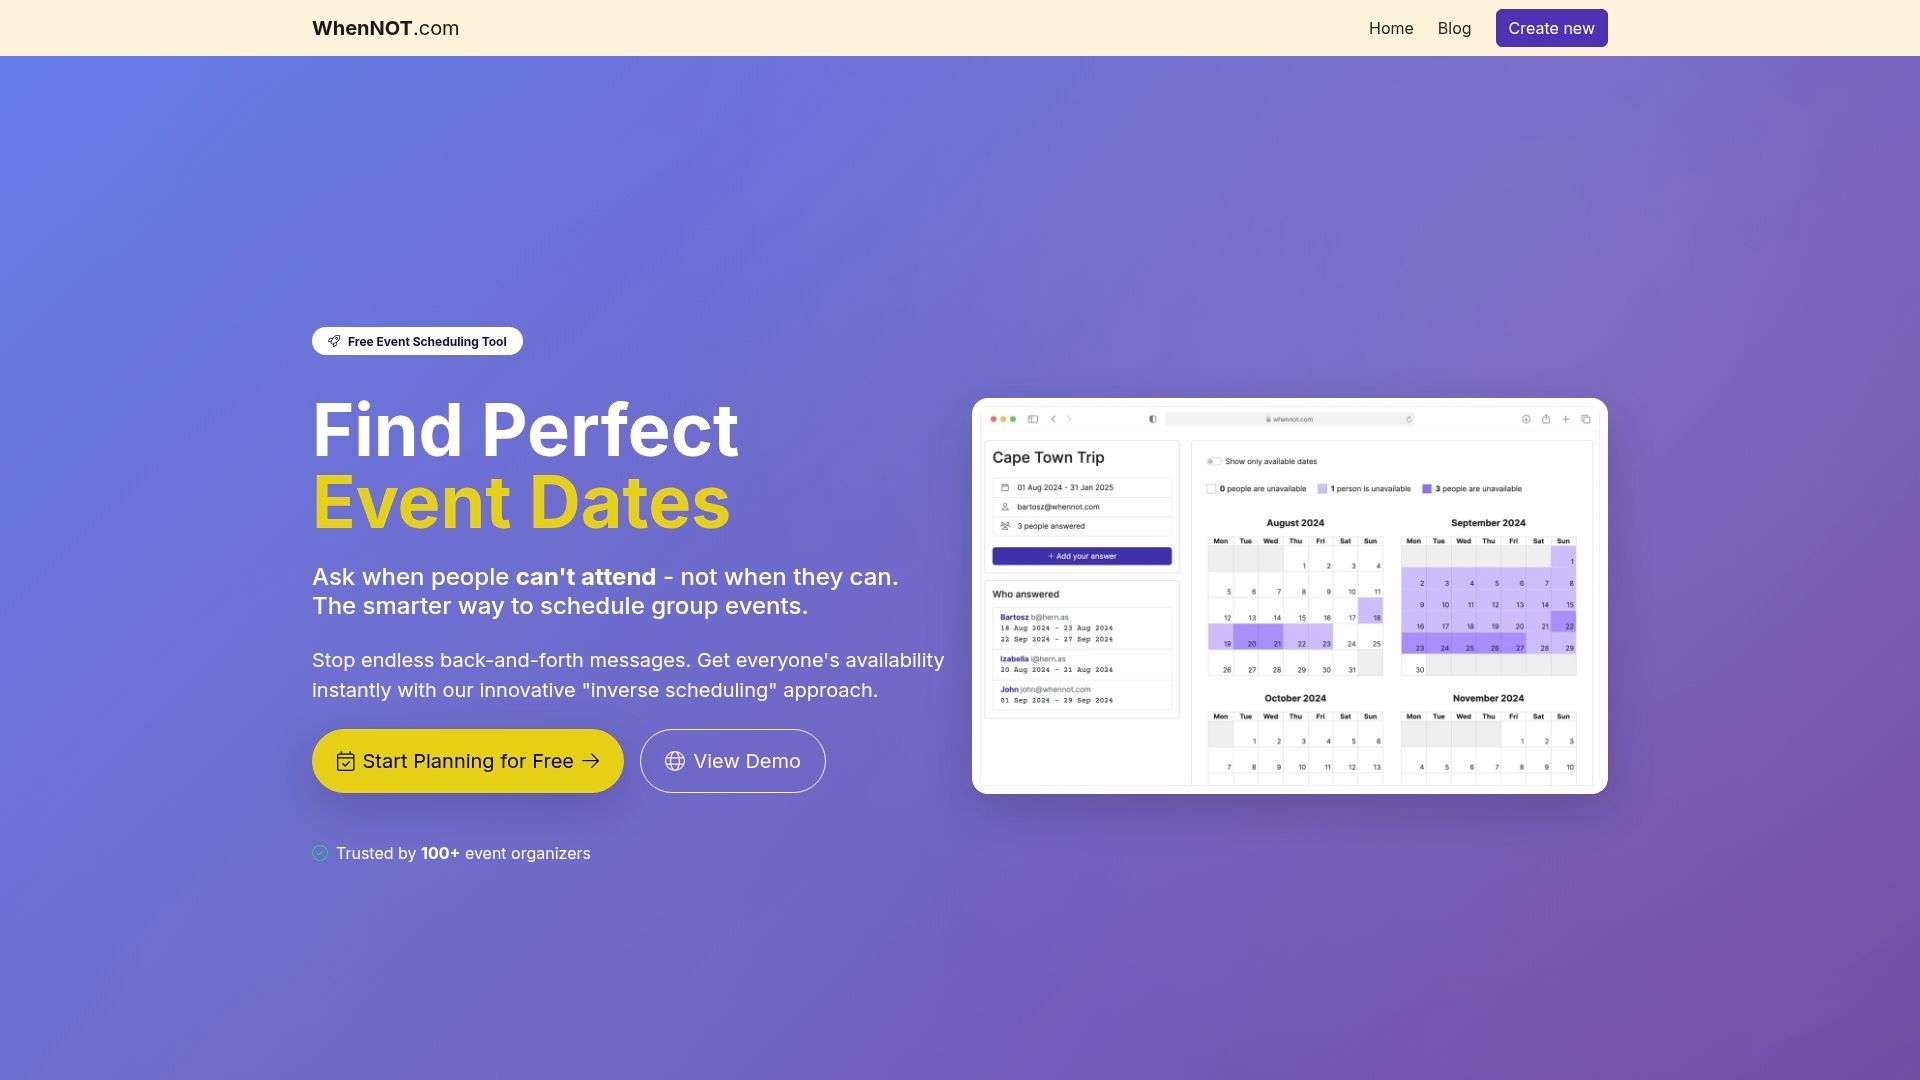
Step 2: Create a group availability poll with WhenNOT
Time to transform your event planning approach with a smarter scheduling method. This step involves creating a group availability poll that makes coordinating schedules incredibly simple and efficient.
According to Cornell University scheduling resources, utilizing tools like WhenNOT allows organizers to create polls where participants can easily indicate their availability. The unique approach here is different from traditional scheduling methods participants will mark their unavailable times instead of available times.
Start by logging into WhenNOT and selecting the create new event option. Enter your event name and the potential date range you identified in the previous step. This gives participants a clear window to indicate their scheduling constraints.
The platform simplifies the process by generating a unique sharing link. Send this link to all participants through email, messaging apps, or your preferred communication channel. Understanding group availability becomes straightforward when everyone can quickly input their constraints.
Pro Tip: Request participants complete their availability within 48 hours to maintain momentum and prevent planning delays.
As participants mark their unavailable dates, WhenNOT automatically visualizes the collective scheduling landscape.
 This means youll quickly see overlapping free periods without endless back and forth communication.
University of Minnesota research highlights that group availability polls help coordinate schedules by collecting participants time constraints efficiently. With WhenNOT, youre not just scheduling an event youre streamlining group coordination.
Once everyone has submitted their unavailable times, youll be ready to select the optimal meeting window. Prepare to move into the final selection phase where perfect timing meets group convenience.
Step 3: Invite participants to mark unavailable dates
With your event poll created, its time to engage your participants and gather their scheduling constraints. This crucial step transforms group coordination from complicated to surprisingly simple.
According to Cornell University scheduling research, encouraging participants to specify their unavailable dates helps efficiently narrow down potential event times that work for everyone. Send your unique WhenNOT event link through multiple communication channels to maximize participation.
Craft a clear and concise message when sharing the link. Explain the purpose of your event, the date range being considered, and provide specific instructions on marking unavailable dates. Efficient group scheduling workflow becomes seamless when participants understand exactly what you need.
Remind participants that marking unavailable dates takes just minutes and requires no account creation. They simply click the link, select their busy times, and submit their constraints. The process is designed to be quick and user friendly.
Pro Tip: Follow up with a friendly reminder 24 hours after initial invitation to ensure maximum participation and response rates.
University of Minnesota research highlights that requesting participants mark unavailable dates ensures the selected event time minimizes conflicts and maximizes potential attendance. By using WhenNOT participants provide their constraints without endless email threads or complicated scheduling discussions.
As responses come in, youll see a real time visualization of collective availability. This transparent approach eliminates guesswork and makes finding the perfect meeting time straightforward.
Prepare for the final step where youll review the compiled availability data and select the optimal event window that works best for your group.
Step 4: Analyze visualized busy days for overlaps
Youre now entering the most insightful phase of group scheduling where complex availability patterns become crystal clear. This step transforms raw scheduling data into a strategic decision making tool.
According to Cornell University scheduling research, reviewing visual representations of participants availability helps identify overlapping busy periods with remarkable precision. WhenNOT provides an intuitive color coded visualization that makes this process seamless and straightforward.
Focus first on the densely colored areas representing collective unavailable times. These darker sections indicate where most participants have scheduling conflicts. By understanding these patterns, youll naturally gravitate toward the lighter colored zones that represent maximum group availability.
Best group scheduling practices become evident when you can see at a glance which dates work best for everyone. Look for consistent light colored sections across the entire date range these are your optimal scheduling windows.
Pro Tip: Dont just look at individual dates examine the overall pattern. Sometimes a slightly less perfect date might offer better overall group convenience.
University of Minnesota research emphasizes that analyzing visualized data on participants busy days assists in pinpointing dates that accommodate the majority. WhenNOT does the heavy lifting by transforming individual schedules into a comprehensive group view.
Consider the percentage of participants available during each potential time window. A date where 80% of participants are free is typically stronger than one where only 50% can attend. The visualization makes these comparisons instantaneous and clear.
With your optimal date now identified prepare to finalize your event details and send out the official invitation.
Youve successfully navigated the most complex part of group scheduling with remarkable efficiency.
Step 5: Select and confirm the optimal event date
Youve reached the final milestone of group scheduling where your strategic planning transforms into a concrete event. This step is about making that definitive choice that works best for everyone.
According to Cornell University scheduling best practices, selecting a date that suits most participants and confirming it promptly ensures effective event planning and communication. Look closely at the visualization and identify the date with the highest overall group availability.
Consider more than just raw numbers. While an 80% availability is promising, also evaluate the quality of those available participants. A date where key decision makers or critical team members can attend takes precedence over pure percentage metrics.
Essential group event scheduling tips recommend communicating your selected date quickly and clearly. Draft a concise message that confirms the event date and provides any additional context participants might need.
Pro Tip: Send a follow up confirmation that includes the specific date, tentative time window, and any preliminary logistical details to build momentum and excitement.
University of Minnesota research emphasizes that finalizing the event date based on comprehensive availability analysis facilitates smooth coordination and maximizes attendance. Your methodical approach has transformed a complex scheduling challenge into a straightforward decision.
Reach out to all participants with a definitive confirmation. Include the date, a brief event description, and express appreciation for their participation in the scheduling process. This transparent communication reinforces the collaborative nature of your planning.
Congratulations. Youve successfully navigated the most challenging aspect of group event coordination with precision and efficiency.
Here's a summary of each event scheduling step:
| Step | Purpose | Key Actions |
|---|---|---|
| Define Event Details | Establish event framework | Set purpose Identify audience Draft description |
| Create Availability Poll | Collect group scheduling constraints | Set date range Create poll in WhenNOT Share link |
| Invite Participants | Gather unavailable dates | Send instructions Request fast response Send reminders |
| Analyze Busy Days | Find optimal scheduling windows | Review visual data Identify overlaps Select best options |
| Select and Confirm Date | Finalize event plan | Choose top date Notify group Send confirmations |
Simplify Your Group Scheduling with WhenNOT Today
The challenge of coordinating busy days for group events can feel overwhelming. This article shows how identifying unavailable times and visualizing overlaps can save you frustration and endless emails. If you want to skip the confusion and swiftly find the perfect date for your next gathering or corporate retreat, you need a smarter approach. WhenNOT uses an inverse scheduling method that asks participants only when they are unavailable. This makes it effortless to spot common free times, even across multi-day date ranges.
Don't let scheduling headaches delay your event. Experience the ease of streamlined group planning by creating your first event at WhenNOT. Share your personalized link and watch as your group effortlessly marks unavailable dates. See how efficient group scheduling workflow and best group scheduling practices are built right into the tool to maximize participation and minimize stress. Take control today and transform complex coordination into a simple, satisfying process with WhenNOT.
Frequently Asked Questions
How do I define my event details for better group availability?
Start by outlining the fundamental elements of your event, including its purpose, target audience, and expected number of participants. This clarity will help you make informed decisions about timing and logistics.
What is the best way to create a group availability poll?
Create a poll where participants indicate their unavailable times rather than their available times. Use a simple template to ask everyone to mark their busy schedules, ensuring accuracy in capturing constraints.
How can I ensure maximum participation when inviting to the availability poll?
Craft a clear and concise message that explains the event's purpose and instructions on marking unavailable dates. Follow up with a friendly reminder 24 hours after the initial invitation to encourage participation.
What should I look for in the visualized data of participants’ availability?
Identify overlapping busy periods by focusing on densely colored areas representing collective unavailability. Aim to find the lighter-colored zones that indicate the best options for scheduling the event.
How do I select the optimal event date based on availability?
Choose the date with the highest overall group availability while also considering the presence of key decision-makers. Make sure to communicate your selected date quickly to all participants for smooth coordination.
What follow-up actions should I take after selecting the event date?
Send a confirmation that includes the event date, a brief description, and any relevant logistical details. This reinforces communication and maintains excitement among participants.